If you sew regularly, there’s one small tool in your kit that quietly saves more projects than any other: the seam ripper.
It’s not flashy.
It’s not expensive.
It doesn’t look impressive.
But this tiny tool can rescue a garment, prevent fabric damage, and turn a frustrating mistake into a clean, professional correction.
Most sewists learn only one basic method—“poke and pull”—and never think much about it again. They may not even know why the seam ripper has that tiny red (or colored) ball on one side of the forked tip.
That small design detail is not decorative. It’s functional. And when you understand how to use it properly, everything changes.
In this comprehensive guide, you’ll learn:
-
What a seam ripper really is and how it works
-
The purpose of each part (including the red ball guard)
-
The safest and most efficient techniques for removing stitches
-
How to prevent accidental fabric damage
-
Professional tips for working with delicate and heavy fabrics
-
Common mistakes to avoid
-
Maintenance and storage advice
-
Advanced seam-ripping strategies for alterations
-
How proper seam removal improves final garment quality
By the end, you’ll use your seam ripper with confidence, precision, and speed—while keeping your fabric intact.
What Is a Seam Ripper, Exactly?
A seam ripper is a small handheld sewing tool designed specifically to cut and remove stitches without damaging surrounding fabric.
At first glance, it looks simple: a short handle attached to a forked metal tip. But every part of it is intentionally engineered.
Let’s break it down.
The Anatomy of a Seam Ripper
1. The Pointed Tip
One side of the fork is sharp and narrow. This pointed end is designed to:
-
Slide under individual stitches
-
Lift threads slightly away from fabric
-
Allow precision cutting in tight areas
This part is ideal when you need to remove a few stitches carefully.
2. The Inner Blade
Between the two prongs of the fork lies a small curved blade. This is the cutting edge. It:
-
Slices through thread cleanly
-
Cuts when thread slides into the curve
-
Works with minimal pressure
The blade is sharp, even if it doesn’t look intimidating. That sharpness is what allows it to cut thread without pulling.
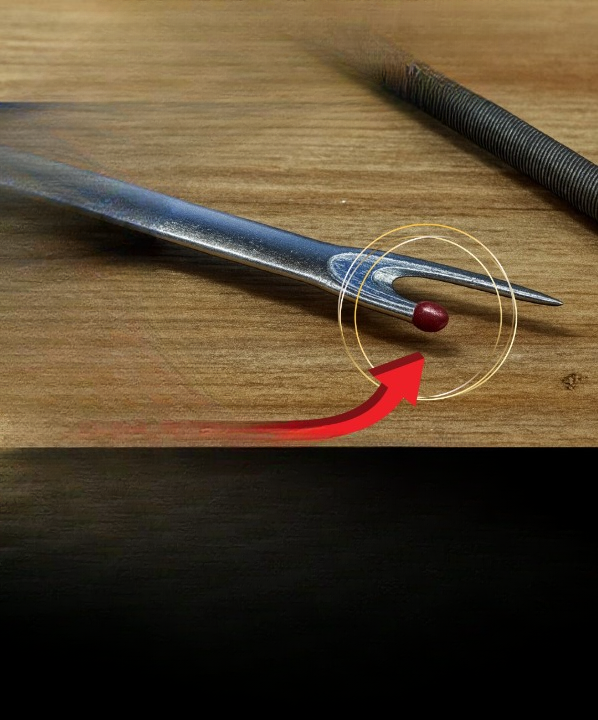
3. The Red Ball (Or Colored Ball)
This small rounded bead on the opposite prong is one of the most misunderstood features.
It serves as:
-
A fabric guard
-
A pressure cushion
-
A glide guide
-
A safety stabilizer
We’ll explore its importance in depth later—but understand this now: it protects your fabric from accidental cuts.
4. The Handle
The handle is usually made of plastic or rubberized material. Its purpose is to:
-
Provide grip
-
Improve control
-
Reduce hand fatigue
-
Allow steady pressure
Some seam rippers have ergonomic grips for extended use.
Why Every Sewist Needs to Master This Tool
Many beginners view a seam ripper as a “mistake fixer.”
But professionals see it differently.
A seam ripper is essential for:
-
Alterations
-
Fit adjustments
-
Construction corrections
-
Design changes
-
Removing basting stitches
-
Opening buttonholes
-
Deconstructing garments
Learning to use it properly protects your time, your fabric, and your finished results.
The Most Common Way People Use It (And Why It’s Not Always Best)
Most sewists start with this method:
-
Insert the pointed tip under a stitch
-
Pull upward
-
Tear through stitches
-
Repeat
While this works, it can:
-
Stretch the seam allowance
-
Snag delicate fibers
-
Leave visible holes
-
Cause accidental slicing
There are better, safer, and faster ways—especially when working with long seams.
Two Primary Seam Ripping Techniques
Which method you use depends on:
-
Fabric type
-
Seam length
-
Thread thickness
-
Whether you’re working inside or outside the seam
Let’s break them down.
Method 1: Precision Removal from the Outside (Delicate Fabrics)
Best for:
-
Silk
-
Fine cotton
-
Lightweight linen
-
Sheer fabrics
-
Detailed seams
Step-by-Step Instructions
-
Lay the fabric flat on a stable surface.
-
Insert the pointed tip under one stitch.
-
Gently lift the stitch upward.
-
Push slightly forward so the blade cuts it.
-
Skip a few stitches and repeat.
-
Once several stitches are cut, gently pull the thread away.
Why this works:
Cutting every third or fourth stitch allows the seam to loosen naturally without stressing the fabric.
This method takes more time—but gives maximum control.
Method 2: Inside Seam Removal Using the Red Ball (Fast and Efficient)
Best for:
-
Long seams
-
Denim
-
Canvas
-
Twill
-
Medium-to-heavy cotton
-
Sturdy woven fabrics
This is where the red ball truly shines.
Step-by-Step Instructions
-
Turn the fabric inside out.
-
Expose the seam allowance.
-
Insert the seam ripper so:
-
The red ball rests against the fabric.
-
The blade faces upward toward stitches.
-
-
Push forward steadily.
-
The blade slices thread while the ball glides along fabric.
This allows you to remove long seams quickly—without risking fabric damage.
Why the Red Ball Is So Important
The red ball is not decorative.
It serves as a built-in guard.
Here’s what it does:
-
Prevents the sharp tip from digging into fabric
-
Distributes pressure evenly
-
Allows smooth gliding motion
-
Reduces risk of accidental holes
-
Protects loosely woven materials
Without it, fast seam removal would be risky.
The ball acts as a buffer between the blade and your cloth.
The Science Behind the Design
When you push the seam ripper forward:
-
Thread slides into the inner blade
-
The blade cuts thread cleanly
-
The red ball skims the surface
-
Fabric stays protected
It’s a simple mechanical design—but highly effective.
Additional Uses for a Seam Ripper
Most people only use it to undo seams.
But it can do much more.
Opening Buttonholes Cleanly
After stitching a buttonhole:
-
Insert the seam ripper inside the stitched area.
-
Place a pin across one end to prevent over-cutting.
-
Gently push forward.
This prevents slicing past the bar tack.
Removing Basting Stitches
Temporary stitches are meant to be removed.
A seam ripper:
-
Cuts them quickly
-
Avoids fabric distortion
-
Prevents snags
Removing Tags or Labels
Instead of scissors:
-
Slide the seam ripper under the tag stitches.
-
Cut carefully.
This minimizes risk of accidental holes—especially in knits.
Deconstructing Garments for Resizing
When altering garments:
-
Remove waistband seams
-
Open side seams
-
Detach sleeves
A seam ripper allows controlled disassembly.
Fabric-Specific Tips
Different fabrics require different approaches.
Silk and Sheer Fabrics
-
Work slowly.
-
Use the outside method.
-
Cut every few stitches.
-
Avoid pulling thread aggressively.
Knit Fabrics
Knits stretch easily.
-
Support fabric with your non-dominant hand.
-
Avoid over-pulling.
-
Work gently to prevent runs.
Denim
Denim seams are thick.
-
Use the red ball method.
-
Apply steady pressure.
-
Remove threads in sections.
Linen
Linen fibers can weaken after stitching.
-
Work carefully.
-
Avoid stretching seam allowance.
-
Remove cut threads immediately.
Common Mistakes to Avoid
Even experienced sewists make errors.
Here are the most common ones.
1. Using the Sharp Tip for Speed
Trying to rip long seams with the pointed tip:
-
Increases fabric risk
-
Causes accidental cuts
Use the red ball method instead.
2. Pulling Too Hard
Yanking thread can:
-
Distort seam allowances
-
Stretch fabric
-
Leave visible holes
Let cut stitches release naturally.
3. Working in Poor Lighting
Dim light increases:
-
Mistakes
-
Fabric damage
-
Eye strain
Always work in bright light.
4. Not Supporting Fabric
Always hold fabric steady.
If it shifts:
-
Blade may slip
-
Thread may snag
5. Using a Dull Seam Ripper
If the blade drags:
-
Replace it.
A dull blade causes more damage than a sharp one.
Professional Tips for Cleaner Results
Want a professional finish? Try these.
Cut Every Third Stitch
Instead of cutting every stitch, space them out.
The seam will loosen naturally.
Brush Away Loose Threads Immediately
Threads can tangle and:
-
Re-catch in blade
-
Confuse stitch lines
Press After Removing Seams
After ripping:
-
Lightly press seam area.
-
Steam helps close minor needle holes.
Replace When Needed
Seam rippers are inexpensive.
If yours dulls or bends, replace it.
How Proper Seam Ripping Improves Final Results
Correct technique:
-
Preserves seam allowances
-
Prevents visible needle holes
-
Maintains fabric integrity
-
Allows smoother resewing
-
Reduces frustration
Professional sewists rarely rush this step.
Storage and Safety
Seam rippers are sharper than they look.
Always:
-
Replace cap after use
-
Store in sewing box
-
Keep away from children
-
Avoid loose storage in drawers
When to Replace Your Seam Ripper
Signs it’s time:
-
Blade pulls instead of slices
-
Visible rust
-
Loose handle
-
Bent tip
Replacement is inexpensive and worthwhile.
Why Patience Matters
Rushing seam removal leads to:
-
Holes
-
Fraying
-
Fabric distortion
Even with the red ball guard, speed must be controlled.
Precision beats haste.
Seam Ripper vs. Scissors
Scissors:
-
Risk cutting fabric
-
Lack precision
-
Difficult in tight areas
Seam rippers:
-
Designed specifically for stitches
-
Minimize fabric damage
-
Offer control
They are not interchangeable tools.
Building Confidence With Practice
If you’re new:
-
Practice on scrap fabric
-
Try both methods
-
Observe how threads release
-
Notice the role of the red ball
Confidence grows quickly.
Final Thoughts: Small Tool, Big Impact
The seam ripper may be one of the smallest tools in your sewing kit—but it carries enormous importance.
When used correctly, it:
-
Saves projects
-
Protects fabric
-
Enables clean alterations
-
Reduces frustration
-
Improves professional finish
The pointed tip is for precision.
The red ball is for protection and glide.
The blade is for clean cuts.
Master these fundamentals, and you’ll discover that this modest tool becomes one of your most trusted sewing companions.
Sewing isn’t about never making mistakes.
It’s about correcting them skillfully.
And the seam ripper—used properly—is the quiet hero that makes that possible.
Happy sewing.