Introduction: Why Refrigerator Cleanliness Matters More Than You Think
Keeping your home clean is an important part of maintaining a comfortable and healthy environment, and one of the most essential areas to focus on is the kitchen. Within the kitchen, the refrigerator plays a central role in preserving food and ensuring it stays safe to consume. Because of this, even small hygiene issues inside or around the refrigerator deserve attention.
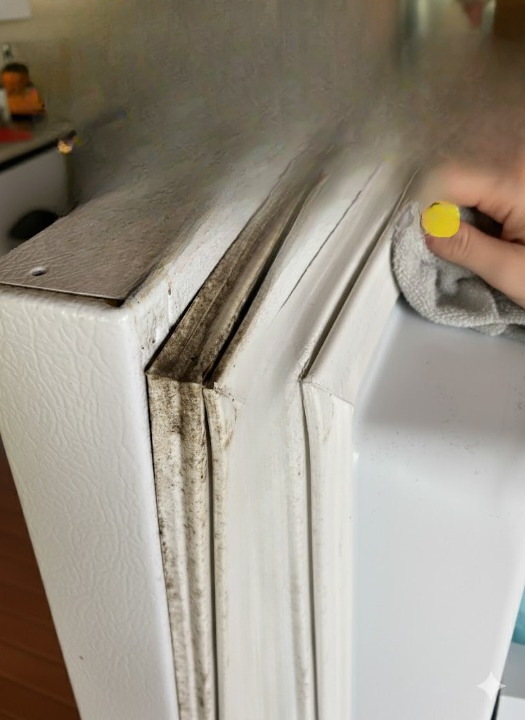
One often-overlooked area is the rubber seal around the refrigerator door, commonly known as the gasket. While it may seem like a minor component, it plays a crucial role in maintaining the appliance’s efficiency by keeping cold air inside. However, due to its design, the gasket can also collect moisture, crumbs, and residue over time.
If not cleaned regularly, this combination of moisture and debris can lead to the growth of mold. While this situation is relatively common in many households, it is something that should be addressed promptly to maintain cleanliness and freshness in your kitchen.
The good news is that cleaning this area does not require complicated tools or expensive products. With a few simple steps and common household items, you can restore your refrigerator gasket and help prevent future buildup.
Understanding Why Mold Forms on Refrigerator Gaskets
To effectively clean and prevent mold, it is helpful to understand why it appears in the first place.
The refrigerator gasket creates an airtight seal, which is essential for keeping food at a safe temperature. However, its folds and creases can trap:
- Moisture from condensation
- Food particles or spills
- Dust and everyday debris
These conditions—especially when combined with warmth from frequent door openings—create an environment where mold can develop.
Unlike flat surfaces, the gasket’s flexible design makes it harder to clean thoroughly during routine kitchen maintenance. As a result, buildup can go unnoticed until it becomes visible.
Why It’s Important to Address the Issue Early
Maintaining a clean refrigerator is about more than appearance. Addressing mold early helps:
- Keep food storage areas hygienic
- Maintain fresh odors in the kitchen
- Preserve the condition of the appliance
- Support overall household cleanliness
When left unattended, buildup can spread within the folds of the gasket and become more difficult to remove. Regular attention helps prevent this from happening.
Preparing for Safe and Effective Cleaning
Before starting the cleaning process, it’s important to gather the right tools and take a few simple precautions.
What You’ll Need
- Warm water
- Mild cleaning agents (such as salt or baking soda)
- A soft brush (like a toothbrush)
- A clean cloth or sponge
- Optional: rubbing alcohol for deeper cleaning
Safety Tips
- Work gently to avoid damaging the gasket
- Avoid overly harsh chemicals that could weaken the rubber
- Ensure the area is well-lit so you can see all surfaces clearly
Taking a careful approach ensures both effective cleaning and long-term durability of your refrigerator seal.
Method 1: Cleaning with Salt and Warm Water
Salt is a simple yet effective cleaning agent that can help remove buildup while being gentle on surfaces.
Steps to Follow
- Mix a small amount of salt into a bowl of warm water until it dissolves.
- Dip a soft brush into the solution.
- Gently scrub the gasket, focusing on folds and corners where residue may collect.
- Wipe the area with a clean, damp cloth to remove any remaining solution.
- Dry thoroughly with a dry cloth.
Why This Works
Salt provides mild abrasion that helps lift debris without causing damage. It is also widely available and easy to use, making it a convenient option for regular maintenance.
Method 2: Using Baking Soda for Gentle Cleaning
Baking soda is another effective and commonly used household cleaner.
Steps to Follow
- Mix baking soda with a small amount of water to form a paste.
- Apply the paste to the gasket using a soft brush or cloth.
- Gently scrub the area, paying attention to creases.
- Wipe clean with a damp cloth.
- Dry completely.
Benefits
- Helps neutralize odors
- Safe for regular use
- Effective at removing light buildup
Method 3: Disinfecting with Rubbing Alcohol
For a deeper clean, rubbing alcohol can be used to help sanitize the surface.
Steps to Follow
- Dampen a cloth or sponge with rubbing alcohol.
- Wipe the gasket thoroughly, focusing on affected areas.
- Allow the surface to air dry.
Why It Helps
Rubbing alcohol evaporates quickly and does not leave excess moisture behind, making it a practical option for reducing buildup while keeping surfaces dry.
Drying: The Most Important Final Step
After cleaning, drying the gasket is essential.
Moisture left behind can create conditions for future buildup, so take the time to:
- Use a clean, dry cloth
- Ensure all folds are dry
- Leave the refrigerator door open briefly if needed
This step is often overlooked but plays a key role in long-term prevention.
Preventing Mold from Returning
Cleaning is only part of the solution. Preventing future buildup requires consistent habits.
1. Regular Maintenance
Check the gasket at least once a month and wipe it down as needed.
2. Keep It Dry
After spills or cleaning, always dry the gasket thoroughly.
3. Clean Spills Promptly
Food residue can contribute to buildup, so addressing spills quickly helps maintain cleanliness.
4. Maintain Airflow
Avoid overpacking the refrigerator, as proper airflow helps reduce moisture accumulation.
5. Use Odor Absorbers
Placing an open box of baking soda inside the refrigerator can help absorb excess moisture and maintain freshness.
Additional Tips for a Cleaner Refrigerator
Keeping your refrigerator in top condition involves more than just cleaning the gasket.
Organize Food Properly
- Store items in sealed containers
- Avoid overcrowding shelves
- Rotate food regularly
Clean Interior Surfaces
Wipe shelves and drawers regularly to prevent residue buildup.
Check Temperature Settings
Maintaining the correct temperature helps reduce condensation and keeps food fresh longer.
Common Mistakes to Avoid
When cleaning your refrigerator gasket, avoid these common errors:
- Using overly harsh chemicals
- Scrubbing too aggressively
- Skipping the drying step
- Ignoring the gasket during routine cleaning
Being mindful of these mistakes helps ensure effective and safe maintenance.
When to Consider Replacing the Gasket
In some cases, cleaning may not be enough. If the gasket shows signs of damage such as:
- Cracks or tears
- Loss of flexibility
- Difficulty sealing properly
It may be time to replace it. A properly functioning gasket is essential for maintaining energy efficiency and food safety.
The Benefits of a Clean Refrigerator
Maintaining a clean refrigerator gasket offers several advantages:
- Improved hygiene
- Better appliance performance
- Reduced odors
- Longer lifespan of the refrigerator
These benefits contribute to a more comfortable and efficient kitchen environment.
Building a Simple Cleaning Routine
Consistency is key to preventing buildup. A simple routine might include:
- Weekly quick wipe-downs
- Monthly deeper cleaning
- Immediate attention to spills
This approach keeps maintenance manageable and effective.
Conclusion: A Small Effort with Big Results
Cleaning your refrigerator gasket may seem like a minor task, but it has a significant impact on the overall cleanliness and efficiency of your kitchen.
By using simple household items and following a regular cleaning routine, you can keep this often-overlooked area in excellent condition.
The key is consistency—addressing small issues before they become larger problems. With the right approach, your refrigerator can remain fresh, clean, and reliable for years to come.
Taking a few minutes to care for your appliance today can make a noticeable difference in your home tomorrow.